


 Eat & Drink

 Travel


 Style
Style


 Beauty


 Health & Wellness


 Home & Decor


 Lifestyle

 Weddings


Summertime in Hong Kong – other than the heat, humidity and collective wishes for midweek typhoon 8s (fingers crossed!), one of my main preoccupations is injecting my wardrobe full of colour. Having spent most of the cooler months with my arms covered up in sleeves, now’s the time to fully embellish my lonely wrists!
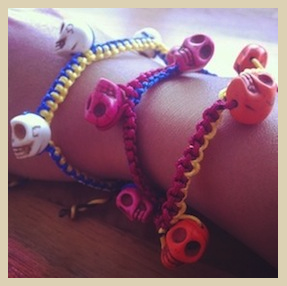
When I was in primary school, my friends and I used to whip up friendship bracelets to share with each other. I never would’ve thought that I’d still be making friendship bracelets now… but turns out they actually still make pretty awesome “arm candy”!
Adding embellishments such as beads, chains or studs gives them an added personal touch and really makes them pop! As a result, these bracelets can be worn anywhere, for any occasion and they’re absolutely ideal for summer. Try it out for yourself and you’ll discover that these bracelets are incredibly versatile, wonderfully colourful and so. easy. to. make!
For this particular bracelet, I followed the “zipper pattern”, which is great for beginners as it uses only three strands of thread and allows beginners to practice forwards and backwards knots.

What you need:
- 3 strands of different coloured embroidery thread – approx 3 times the length of your wrist (one of the colours will not be seen in the bracelet; I used black in my bracelet)
- Scissors
- Sticky Tape
- Beads (if you wish to embellish your bracelet, I used 4) – be sure that the bead’s hole is big enough for the thread to fit through
- Sewing needle
How to:
1. Tie your three threads in a knot, leaving at least 3 inches of slack on the top.
2. Order your threads (in my case; red, black, blue). Using the sticky tape, stick the threads down above the knot.

3. Take the red thread and tie a forward knot onto the black thread (the red thread will create a 4 shape over the black thread), then tie a backwards knot with the red thread (the red thread will create a backwards 4 shape over the black thread).

4. Take the blue thread and tie a forward knot onto the black thread (the blue thread will create a backwards 4 shape over the black thread), then tie a backwards knot with the blue thread (the blue thread will create a 4 shape over the black thread)

5. Continue steps 3 and 4 until the bracelet is about an inch in length. Using the sewing needle, thread the red embroidery thread through the bead and proceed to tie a forwards and then a backwards knot.

6. Continue with steps 3 and 4 until there is another inch in length from the first bead. Then thread the blue embroidery thread through the second bead then secure with a forwards and backwards knot.
7. Continue with steps 5 and 6 until the 4 beads are threaded onto the bracelet.

9. Finish with a knot.
10. To make it look neater, braid the loose threads on either end of the bracelet.

Ta-da!
I hope you like these friendship bracelets; they’ll be sure to keep you busy all summer long and your wrists fully DIY-embellished. Happy summer everyone!
Check out more of Vanessa’s fantastic DIY projects, plus all things fashionable and fabulous, on her blog All Things Indulgent!